Showing posts with label Too Cute Crochet. Show all posts

Beginner Crochet Tips Part 4: Learn the Basic Stitches

Build A Shell Blanket and Bonnet

 Crocheting is a wonderful and creative way to spend your time. Whether you're a beginner or an experienced crocheter, it's important to practice basic stitches regularly to improve your skills and build your confidence. In this blog post, we'll discuss the best ways to practice basic stitches in crochet.

  1. Choose the Right Yarn and Hook Before you start practicing, it's important to choose the right yarn and hook for your project. Different types of yarn and hooks can produce different results, so it's essential to select the right tools for your project. Start with a medium weight yarn and a hook size that feels comfortable in your hand.

  2. Use Practice Patterns There are many patterns available for practicing basic stitches in crochet. Practice patterns can help you focus on a specific stitch or technique, allowing you to master it before moving on to more advanced projects. Look for patterns that are simple and easy to follow, with clear instructions and diagrams.

  3. Start with Simple Stitches When you're just starting out, it's best to stick to simple stitches such as single crochet, double crochet, and half-double crochet. These stitches are the foundation of many crochet projects and will help you build your skills and confidence. Once you feel comfortable with these stitches, you can move on to more complex techniques.

  4. Practice Regularly Practice makes perfect, and the more you crochet, the better you'll get. Set aside some time each day or week to practice your stitches, even if it's just for a few minutes. Over time, you'll notice that your stitches become more even and your tension improves.

  5. Try Different Projects Don't be afraid to try different projects to practice your stitches. Experiment with different types of yarn and hooks, and try making small items such as coasters or dishcloths. These projects are quick and easy to make, and they allow you to practice your stitches without committing to a larger project.

Practicing basic stitches in crochet is essential for improving your skills and building your confidence. By choosing the right tools, using practice patterns, starting with simple stitches, practicing regularly, and trying different projects, you can become a confident and skilled crocheter in no time. Happy crocheting!

You can find me on Instagram @jocelynsass

toocutecrochet.etsy.com

jocelyndesigns.etsy.com

cutecrochetshop.etsy.com


Pin It!

Beginner Crochet Tips Part 2: Start With Simple Patterns

Build A Multicolor Triple Shell Blanket


Crochet is a great way to unwind and create something beautiful at the same time. For beginners, finding the right pattern can be intimidating. You don't want to choose something too complicated, but at the same time, you want to make sure you are challenged enough to learn something new. Here are some tips on how to choose simple and fun crochet patterns for beginners:

  1. Look for simple stitches and patterns When you're first starting out, it's important to find a pattern with simple stitches and patterns. Single crochet, double crochet, and half double crochet are all basic stitches that are easy to learn. Avoid patterns with complex stitches like puff stitch, shell stitch, or popcorn stitch until you are comfortable with the basics.

  2. Choose a small project Choose a small project like a dishcloth or a coaster to start with. This will give you a sense of accomplishment without overwhelming you with a large project. You can move on to bigger projects like hats, scarves, or blankets once you feel more confident.

  3. Use the correct yarn When choosing yarn, look for something easy to work with like acrylic yarn. This type of yarn is affordable, easy to find, and comes in a wide variety of colors. Avoid using fancy or novelty yarn until you are comfortable with the basics.

  4. Check the skill level Most crochet patterns will indicate a skill level, such as beginner, intermediate, or advanced. Make sure you choose a pattern that is labeled as beginner. This will help ensure that the pattern is easy enough for you to follow.

  5. Look for patterns that are visually appealing Choose a pattern that you find visually appealing. This will motivate you to finish the project and give you a sense of pride in your finished creation.

  6. Take advantage of online resources There are many online resources for crochet patterns, including websites like Ravelry and Pinterest. These sites have a vast collection of patterns, and you can search for patterns by skill level, project type, and more. Additionally, many crochet bloggers and YouTube creators offer free patterns and tutorials that are perfect for beginners.

Choosing a simple and fun crochet pattern for beginners is all about finding a project that is easy to follow, visually appealing, and enjoyable to work on. By starting with small projects, using simple yarn, and taking advantage of online resources, you can learn the basics of crochet while creating beautiful and practical items. Remember, practice makes perfect, so keep trying new patterns and techniques, and soon you'll be a crochet pro!

You can find me on Instagram @jocelynsass

toocutecrochet.etsy.com

jocelyndesigns.etsy.com

cutecrochetshop.etsy.com


Pin It!

Beginner Crochet Tips Part 1: Choosing the Right Yarn and Hook Size

Apple Hat
Crochet is a popular and fun craft that allows you to create beautiful and intricate designs using just a hook and yarn. However, choosing the right yarn and hook for your project can be a daunting task, especially for beginners. In this Beginner Crochet Tips blog post, we will discuss how to choose the correct yarn and hook in crochet.

  1. Yarn Weight

The weight of the yarn you choose is the most important factor to consider when starting a crochet project. Yarn weight is determined by its thickness, and it's important to choose the right weight for your project to ensure that your finished product looks as intended.

Yarn weight is usually classified by numbers, with 0 being the thinnest (lace weight) and 6 being the thickest (super bulky). The most commonly used yarn weights for crochet are worsted (medium) and DK (light). Before you start your project, check the recommended yarn weight for your pattern, and choose a yarn of the same weight.

  1. Fiber Content

The fiber content of the yarn you choose will determine the drape, texture, and durability of your finished project. Yarn can be made from a variety of fibers, including wool, cotton, acrylic, and silk.

Wool yarns are warm and durable, making them a good choice for hats, scarves, and blankets. Cotton yarns are cool and breathable, making them ideal for summer garments and accessories. Acrylic yarns are easy to care for and come in a wide range of colors, making them a popular choice for beginners. Silk yarns are luxurious and drape beautifully, but they are more expensive than other types of yarn.

  1. Hook Size

The hook size you use will also affect the look and feel of your finished project. Crochet hooks are available in a range of sizes, from tiny steel hooks to large plastic hooks. The size of the hook you choose will depend on the weight of the yarn you're using and the stitch pattern you're using.

As a general rule, the thicker the yarn, the larger the hook you'll need. However, the size of the hook also depends on the stitch pattern you're using. If you're working with a tight stitch pattern, you may need a larger hook to achieve the desired tension.

  1. Consider Your Project

It's important to consider the type of project you're working on when choosing your yarn and hook. For example, if you're making a scarf, you may want to choose a yarn that is soft and warm, and a hook that is comfortable to hold for long periods. If you're making a lacy shawl, you may want to choose a lightweight yarn and a small hook to achieve a delicate, airy look.

Choosing the right yarn and hook for your crochet project is essential to achieving the desired outcome. With a little practice, you'll soon become an expert at choosing the perfect yarn and hook for all your crochet projects!

You can find me on Instagram @jocelynsass

toocutecrochet.etsy.com

jocelyndesigns.etsy.com

cutecrochetshop.etsy.com


Pin It!

How Much Yarn Will I Need to Crochet a Baby Blanket?


Build A Granny Stitch Baby Blanket in Any Size


Crocheting a baby blanket can be a fun and rewarding project, but it's important to have a good understanding of how much yarn you'll need before you get started. In this post, we will explore the three key factors that determine how much yarn you'll need for your baby blanket: yarn weight, crochet stitch, and blanket size.

Yarn Weight

The weight of your yarn is an important factor to consider when determining how much yarn you'll need for your baby blanket. Yarn weight refers to how thick or thin the yarn is, and it is usually indicated on the yarn label. Yarn comes in a variety of weights, from super bulky to lace weight. Thicker yarns require fewer skeins, while thinner yarns require more.

For a typical baby blanket, a medium weight yarn (also known as worsted weight) is usually a good choice. Worsted weight yarns typically come in skeins of 100-200 grams, and each skein can contain anywhere from 150 to 300 yards of yarn, depending on the brand.

Crochet Stitch

Different crochet stitches use different amounts of yarn. Some stitches use more yarn than others, so it's important to choose a stitch that will give you the look and feel you want for your baby blanket, while also using an appropriate amount of yarn.

For example, the double crochet stitch uses more yarn than the single crochet stitch, because it has more loops and requires more yarn to complete each stitch. If you're using a stitch that uses more yarn, you'll need to buy more skeins of yarn to complete your project.

Blanket Size

The size of your baby blanket is another important factor to consider when determining how much yarn you'll need. The larger the blanket, the more yarn you'll need to complete it.

Common crocheted baby blanket sizes are:

  • Receiving Blanket: 28"-36" square
  • Swaddle Blanket: 36" x 36" or 48" x 48" (suggested sizes)
  • Stroller/Car Seat Blanket: 30"-40" Rectangular
  • Crib Blanket: 40" x 60"

 When you're planning to crochet a baby blanket, one of the most common questions that arises is, "How much yarn do I need?" The answer to this question depends on several factors, including the size of the blanket, the weight of the yarn, and the crochet stitch you'll be using.

Assuming you'll be using worsted weight yarn, a typical baby blanket will require between 700 to 1500 yards of yarn. However, keep in mind that the size of the blanket will greatly affect the amount of yarn needed. A smaller blanket, like a receiving blanket, will require less yarn than a larger crib blanket.

To get a more precise estimate of how much yarn you'll need, consider the weight of the yarn you'll be using. A 3.5 oz skein of worsted weight yarn typically has 220 yards of yarn. Based on this, you can calculate that a baby blanket will need 3-7 skeins of yarn, depending on the size of the blanket.

It's important to note that different types of yarn have different yardage amounts, so it's always a good idea to check the label to see how many yards are in a skein. Some larger skeins may contain enough yarn to complete a baby blanket with fewer skeins.

To estimate how much yarn you'll need for your baby blanket, you'll need to know the dimensions of the blanket you want to make (above). You can then use a yarn calculator to determine how much yarn you'll need based on the weight of your yarn and the stitch you'll be using.

Yarn Calculator

Using a yarn calculator is a great way to estimate how much yarn you'll need for your baby blanket. There are many free online yarn calculators available that can help you determine how much yarn you'll need based on the weight of your yarn, the stitch you'll be using, and the size of the blanket you want to make.

To use a yarn calculator, (link below) you'll need to know the weight and length of your yarn, the crochet stitch you'll be using, and the dimensions of your blanket. Once you enter this information, the yarn calculator will tell you how many skeins of yarn you'll need to complete your project.

Yarn Label

Another way to determine how much yarn you'll need for your baby blanket is to check the yarn label. Most yarn labels will provide an estimate of how much yarn is needed for a particular project based on the weight of the yarn and the size of the project.

Keep in mind that these suggestions are just estimates, and depending on the stitch and tension (gauge) you use, you may need slightly more or less yarn. It's always better to have extra yarn on hand, just in case! Who doesn't need more yarn anyway? :)

If you do end up with extra yarn, consider making a baby bonnet or cap to match the blanket. You can see some crochet patterns that are available at Too Cute Crochet here:

Pixie Cap

Pretty Petal Cap 

Baby Bonnet Pattern Trio 

Here is a link to a few yarn calculators that should be helpful to you:

https://easycrochet.com/calculators/

 You can find me on Instagram @jocelynsass

toocutecrochet.etsy.com

jocelyndesigns.etsy.com

cutecrochetshop.etsy.com


Pin It!

Is GAUGE Important When Crocheting From a Pattern?

Crochet Gauge: Why It Matters and How to Get It Right

If you're an experienced crocheter, you may be tempted to skip the step of checking your gauge before starting a new project. However, taking the time to get your gauge right can make all the difference in the finished product. Here's why crochet gauge matters and how to ensure that you're getting it right.

What is Crochet Gauge?

Crochet gauge refers to the number of stitches and rows that you can expect to achieve when you use a particular hook size and yarn weight. To determine your gauge, you'll need to make a small swatch of the pattern you'll be using and measure it to see how many stitches and rows you're getting per inch. Once you know your gauge, you can adjust your hook size or yarn weight to achieve the correct number of stitches and rows for your project.

Why Does Crochet Gauge Matter?

Getting your crochet gauge right is important for several reasons. First and foremost, it ensures that your finished project will turn out the way you intended. If your gauge is too loose or too tight, your project may end up too big or too small, and the stitch pattern may not look right. Additionally, getting your gauge right can help you avoid running out of yarn or having to buy more than you need. By knowing how many stitches and rows you can expect to achieve with a particular hook size and yarn weight, you can estimate how much yarn you'll need to complete your project.

How to Get Your Crochet Gauge Right

To get your crochet gauge right, you'll need to follow a few simple steps:

  1. Choose your yarn and hook. Start by selecting the yarn and hook that your pattern calls for. If you're not using a pattern, choose the yarn and hook that you want to use for your project.

  2. Make a swatch. Crochet a swatch that is at least 4 inches by 4 inches using the stitch pattern you'll be using for your project.

  3. Measure your swatch. Use a ruler or measuring tape to measure the number of stitches and rows per inch in your swatch. Make sure to measure in the same direction as you crocheted your swatch.

  4. Adjust your hook size or yarn weight. If your gauge is off, you can adjust your hook size up or down to achieve the correct number of stitches and rows per inch. 

  5. Crochet another swatch. Once you've adjusted your hook size, crochet another swatch and measure it to make sure you've achieved the correct gauge.

By taking the time to get your crochet gauge right, you can ensure that your finished project turns out the way you intended. While it may be tempting to skip this step, it's worth the extra time and effort to get it right. Happy crocheting!

You can find me on Instagram @jocelynsass

toocutecrochet.etsy.com

jocelyndesigns.etsy.com

cutecrochetshop.etsy.com


Pin It!

Beginner Crochet Tips

This post is an overview of crochet tips for beginning crocheters. Stay tuned for more in-depth posts about the tips to come!

Crochet is a fun and rewarding hobby that can be enjoyed by people of all ages and skill levels. However, it can be a little daunting for beginners who are just starting out. If you're new to crochet and are looking for some tips to help you get started, then you're in the right place. In this post, we've compiled a list of the top 10 tips for beginning crochet. 

Build-A-Shell Baby Blanket


 1. Choose the Right Yarn and Hook Size

 
Choosing the right yarn and hook size is crucial when it comes to crochet. You want to make sure that you're using the right yarn and hook size for the project you are going to work on. The yarn label will typically give you the information on the recommended size hook to use make sure to follow these guidelines to ensure your finished project turns out the way you want it to!

2. Start With Simple Patterns 

When you're just starting out with crochet, it's best to start with simple patterns. 
Choose a pattern that only requires basic stitches such as single crochet or double crochet. As you become more confident with your skills, you can gradually work your way up to more complex patterns. 

3. Practice Your Tension

Tension is an important aspect of crochet that can take some time to master. It's important to practice your tension by making swatches before you start working on a project. This will help you get a real feel for how tightly or loosely you need to crochet to achieve the right tension.

4. Learn the Basic Stitches

As mentioned earlier, it's important to start with simple patterns that only require basic stitches. Make sure that you know how to do the basic stitches such as chain, sl st, single crochet, double crochet, half double crochet and treble crochet. These stitches form the basis of most crochet patterns.If you need help, there are many YouTube videos for beginner crocheters.

5. Take Breaks

Crochet can be quite addictive, but it's important to take breaks to avoid strain and fatigue. Take a break every 30 minutes or so to stretch your hands and arms, and to give your eyes a rest.
 
6. Use Stitch Makers

Stitch markers are an invaluable tool when it comes to crochet. They can be used to mark the beginning of a round or row, to mark a specific stitch or to keep track of pattern repeats. Use them liberally to help keep track of your work.

7. Keep Your Work Organized

Crochet projects can quickly become a mess of yarn and hooks if you're not careful. Keep your work organized by using a project bag to store your yarn and hooks, and by using stitch markers to keep track of your progress.

8. Join a Crochet Community

Joining a crochet community, whether online or in-person, can be a great way to connect with other crocheters and to learn new tips and tricks. There are many online communities and forums dedicated to crochet, so find one that suits you and get involved!

9. Don't Be Afraid to Make Mistakes 

Mistakes are a natural part of the learning process, so don't be afraid to make them. If you make a mistake, don't worry about it – simply undo the stitches and try again. Remember, practice makes perfect!

10. Enjoy the Process

Finally, it's important to remember to enjoy the process of crochet. Crochet can be a very meditative and relaxing hobby, so take your time and enjoy the process of creating something beautiful with your own two hands.

Crochet is a fun and rewarding hobby that can be enjoyed by anyone. By following these top 10 tips for beginning crochet, you'll be well on your way to creating beautiful crochet projects in no time. 
Happy crocheting!
 
THE BEGINNER CROCHET TIPS SERIES BEGINS HERE
 
You can find me on Instagram @jocelynsass
and on Etsy at: 


Pin It!

Easy Pumpkin Tabletop Pumpkins Crochet Pattern

 This is one of my most favorite designs for Fall. And it is a free crochet pattern! 

You can see them in use for a photoshoot HERE:


TABLETOP PUMPKINS


Design by Jocelyn Sass         Copyright 2022 Cute Crochet     www.cutecrochet.com

Tabletop Pumpkins are copyrighted Cute Crochet 2022

You may print it for your personal use, but you may not copy, distribute it, or sell it.

RICH, RUSTIC COLORS COMPLIMENT THE DESIGN OF THIS SIMPLE-TO-CROCHET ITEM FOR YOUR HOME. WHETHER YOU PLACE IT ON A TABLE, HUTCH OR MANTLE,
IT WILL INSPIRE WARMTH FOR YOUR DÉCOR.  

Materials:  Red Heart Supersaver worsted weight yarn, 3-1/2 oz. #256 Carrot,
3 oz. #981 Fall (variegated color); G (4mm) hook;
Natural Raffia Straw by American Oak Preserving Company;
½” thick Tree Branch from your yard;
Aleene’s Thick Designer Craft Glue; polyester fiberfill; tapestry needle; craft knife

Size:  Large Pumpkin measures 6-1/2” High & 7-1/2” Wide without stem.
Gauge:  4 sc =  1 inch;  4 rows =  1 inch
LARGE PUMPKIN
Rnd 1: Starting at Bottom, with Fall, ch 2; 6 sc in 2nd ch from hook; join with a sl st to first sc, ch 1, turn. (6).

Rnd 2: 2 sc in ea sc around; join, ch 1, turn. (12).

Rnd 3:  (Sc in next sc, 2 sc in next sc) around; join, ch 1, turn. (18).

Rnd 4:  (Sc in next 2 sc, 2 sc in next sc) around; join, ch 1, turn. (24).

Rnd 5:  (Sc in next 3 sc, 2 sc in next sc) around; join, ch 1, turn. (30).

Rnd 6:  (Sc in next 4 sc, 2 sc in next sc) around; join, ch 1, turn. (36).

Rnd 7:  (Sc in next 5 sc, 2 sc in next sc) around; join, ch 1, turn. (42).

Rnd 8:  (Sc in next 6 sc, 2 sc in next sc) around; join, ch 1, turn. (48).

Rnd 9:  (Sc in next 7 sc, 2 sc in next sc) around; join, ch 1, turn. (54).

Rnd 10:  (Sc in next 8 sc, 2 sc in next sc) around; join, ch 1, turn. (60).

Rnd 11:  (Sc in next 9 sc, 2 sc in next sc) around; join, ch 1, turn. (66).

Rnd 12:  (Sc in next 10 sc, 2 sc in next sc) around; join, ch 1, turn. (72).

Rnd 13:  (Sc in next 11 sc, 2 sc in next sc) around; join, ch 1, turn. (78).

Rnds 14-34:  Sc in ea sc around; join, ch 1, turn. (78).

Rnd 35:  (Sc in next 11 sc, dec over next 2 sc) around; join, ch 1, turn. (72).

Rnd 36:  (Sc in next 10 sc, dec over next 2 sc) around; join, ch 1, turn. (66).

Rnd 37:  (Sc in next 9 sc, dec over next 2 sc) around; join, ch 1, turn. (60).

Rnd 38:  (Sc in next 8 sc, dec over next 2 sc) around; join, ch 1, turn. (54).

Rnd 39:  (Sc in next 7 sc, dec over next 2 sc) around; join, ch 1, turn. (48).
Begin stuffing pumpkin firmly.

Rnd 40:  (Sc in next 6 sc, dec over next 2 sc) around; join, ch 1, turn. (42).

Rnd 41:  (Sc in next 5 sc, dec over next 2 sc) around; join, ch 1, turn. (36).

Rnd 42:  (Sc in next 4 sc, dec over next 2 sc) around; join, ch 1, turn. (30).
Continue stuffing pumpkin firmly.

Rnd 43:  (Sc in next 3 sc, dec over next 2 sc) around; join, ch 1, turn. (24).

Rnd 44:  (Sc in next 2 sc, dec over next 2 sc) around; join, ch 1, turn. (18).
Finish stuffing pumpkin.

Rnd 45: (Sc in next sc, dec over next 2 sc) around; join with a sl st to first sc.
Fasten off, leaving long length for sewing. 

FINISHING
Using a craft knife, cut ½” tree branch into one, 3” piece and two, 2-1/2” pieces. Thread length of yarn left from fastening off Rnd 45 into a tapestry needle. Thread through stitches of Rnd 45 to gather.
Place glue on one end of the 3” piece of tree branch. Place glue-end down into opening of Rnd 45. Pull gathered stitches closed over branch to tighten and hold in place. Knot and secure in place with a few stitches. Let branch dry.
Cut raffia into four 24” pieces. Tie the raffia pieces around stem of tree branch as shown in photo. Glue in place if needed to secure. Trim ends of raffia to desired length.
NOTEIf desired, to shape the crochet piece more like a pumpkin, thread approximately 14” Pumpkin color yarn into a tapestry needle.  Tie a large knot in thread leaving 3 inches at bottom of thread. Starting at top behind wooden stem, thread yarn completely through entire pumpkin and come out the bottom. Tighten pumpkin as desired, making a few stitches to secure in place. Using tapestry needle, bury end of thread into pumpkin to hide.

 SMALL PUMPKIN (Make 2)

Rnd 1: Starting at Bottom, with Carrot, ch 2; 6 sc in 2nd ch from hook; join with a sl st to first sc, ch 1, turn. (6).

Rnds 2-10: Repeat Rnds 2-10 of Large Pumpkin. (60).

Rnds 11-26:  Sc in ea sc around; join, ch 1, turn. (60).

Rnd 27:  (Sc in next 8 sc, dec over next 2 sc) around; join, ch 1, turn. (54).

Rnd 28:  (Sc in next 7 sc, dec over next 2 sc) around; join, ch 1, turn. (48).

Rnd 29:  (Sc in next 6 sc, dec over next 2 sc) around; join, ch 1, turn. (42).
Begin stuffing pumpkin firmly.

Rnds 30-34:  Repeat Rnds 40-44 of Large Pumpkin. (18).
Finish stuffing pumpkin.

Rnd 35: (Sc in next sc, dec over next 2 sc) around; join with a sl st to first sc.
Fasten off, leaving long length for sewing.

FINISHING
Place glue on one end of the 2-1/2” piece of tree branch. Place glue-end down into opening of Rnd 35. Pull gathered stitches closed over branch to tighten and hold in place. Knot and secure in place with a few stitches. Let branch dry.
Cut raffia into four 18” pieces. Tie the raffia pieces around stem of tree branch as shown in photo. Glue in place if needed to secure. Trim ends of raffia to desired length.
Repeat FINISHING for second SMALL PUMPKIN.
NOTEIf desired, to shape the crochet piece more like a pumpkin, thread approximately 14” Pumpkin color yarn into a tapestry needle.  Tie a large knot in thread leaving 3 inches at bottom of thread. Starting at top behind wooden stem, thread yarn completely through entire pumpkin and come out the bottom. Tighten pumpkin as desired, making a few stitches to secure in place. Using tapestry needle, bury end of thread into pumpkin to hide.  
 
SMALL PATCH
Row 1: With Fall, ch 5; sc in 2nd ch from hook and in ea ch across,
ch 1, turn. (4). 

Rows 2-4:  Sc in ea sc across, ch 1, turn. (4). 
Fasten off, leaving length for sewing.  Sew small patch to bottom side of one pumpkin.

LARGE PATCH
Row 1: With Fall, ch 6; sc in 2nd ch from hook and in ea ch across,
ch 1, turn. (5). 

Rows 2-5:  Sc in ea sc across, ch 1, turn. (5).
Fasten off, leaving length for sewing.  Sew large patch to top side of one pumpkin.

Copyright 2022 Jocelyn Sass  Cute Crochet   All rights reserved. 
Pin It!

Sale Patterns at Too Cute Crochet 3 in One!

 
Our three (3) MOST POPULAR BONNET CROCHET PATTERNS all together in ONE SET for a DISCOUNTED price!

Bonnet Pattern Trio

These BONNETS are great for new baby or your favorite child! Fun to crochet and quick to make!

Build A Shell Stitch Bonnet comes in 4 sizes ranging from Newborn to 2T-4T.
Build A Shell Bonnet comes in 4 sizes ranging from Newborn to 2T-4T.
Build A Star Ripple Bonnet comes in 2 sizes, Newborn and 3 months.

These patterns also work up quickly for last minute baby shower gifts!

https://www.etsy.com/listing/195351201/sale-easy-crochet-patterns-baby-blanket
 Our three (3) MOST POPULAR baby blanket CROCHET PATTERNS all together in ONE SET
for a DISCOUNTED price!


Please see the INDIVIDUAL listings for more details.
https://www.etsy.com/shop/TooCuteCrochet?section_id=12541707&ref=shopsection_leftnav_7

https://www.etsy.com/listing/197132801/child-baby-hat-easy-crochet-patterns

Our three (3) MOST POPULAR FALL AUTUMN CROCHET PATTERNS all together in ONE SET
for a DISCOUNTED price! 

Fall/Autumn Pattern Trio

THESE PATTERNS ARE ALL SIZED FOR 0-10 YEARS, CHILD AND BABY!


https://www.etsy.com/listing/215060095/easy-crochet-pattern-sale-baby-child 
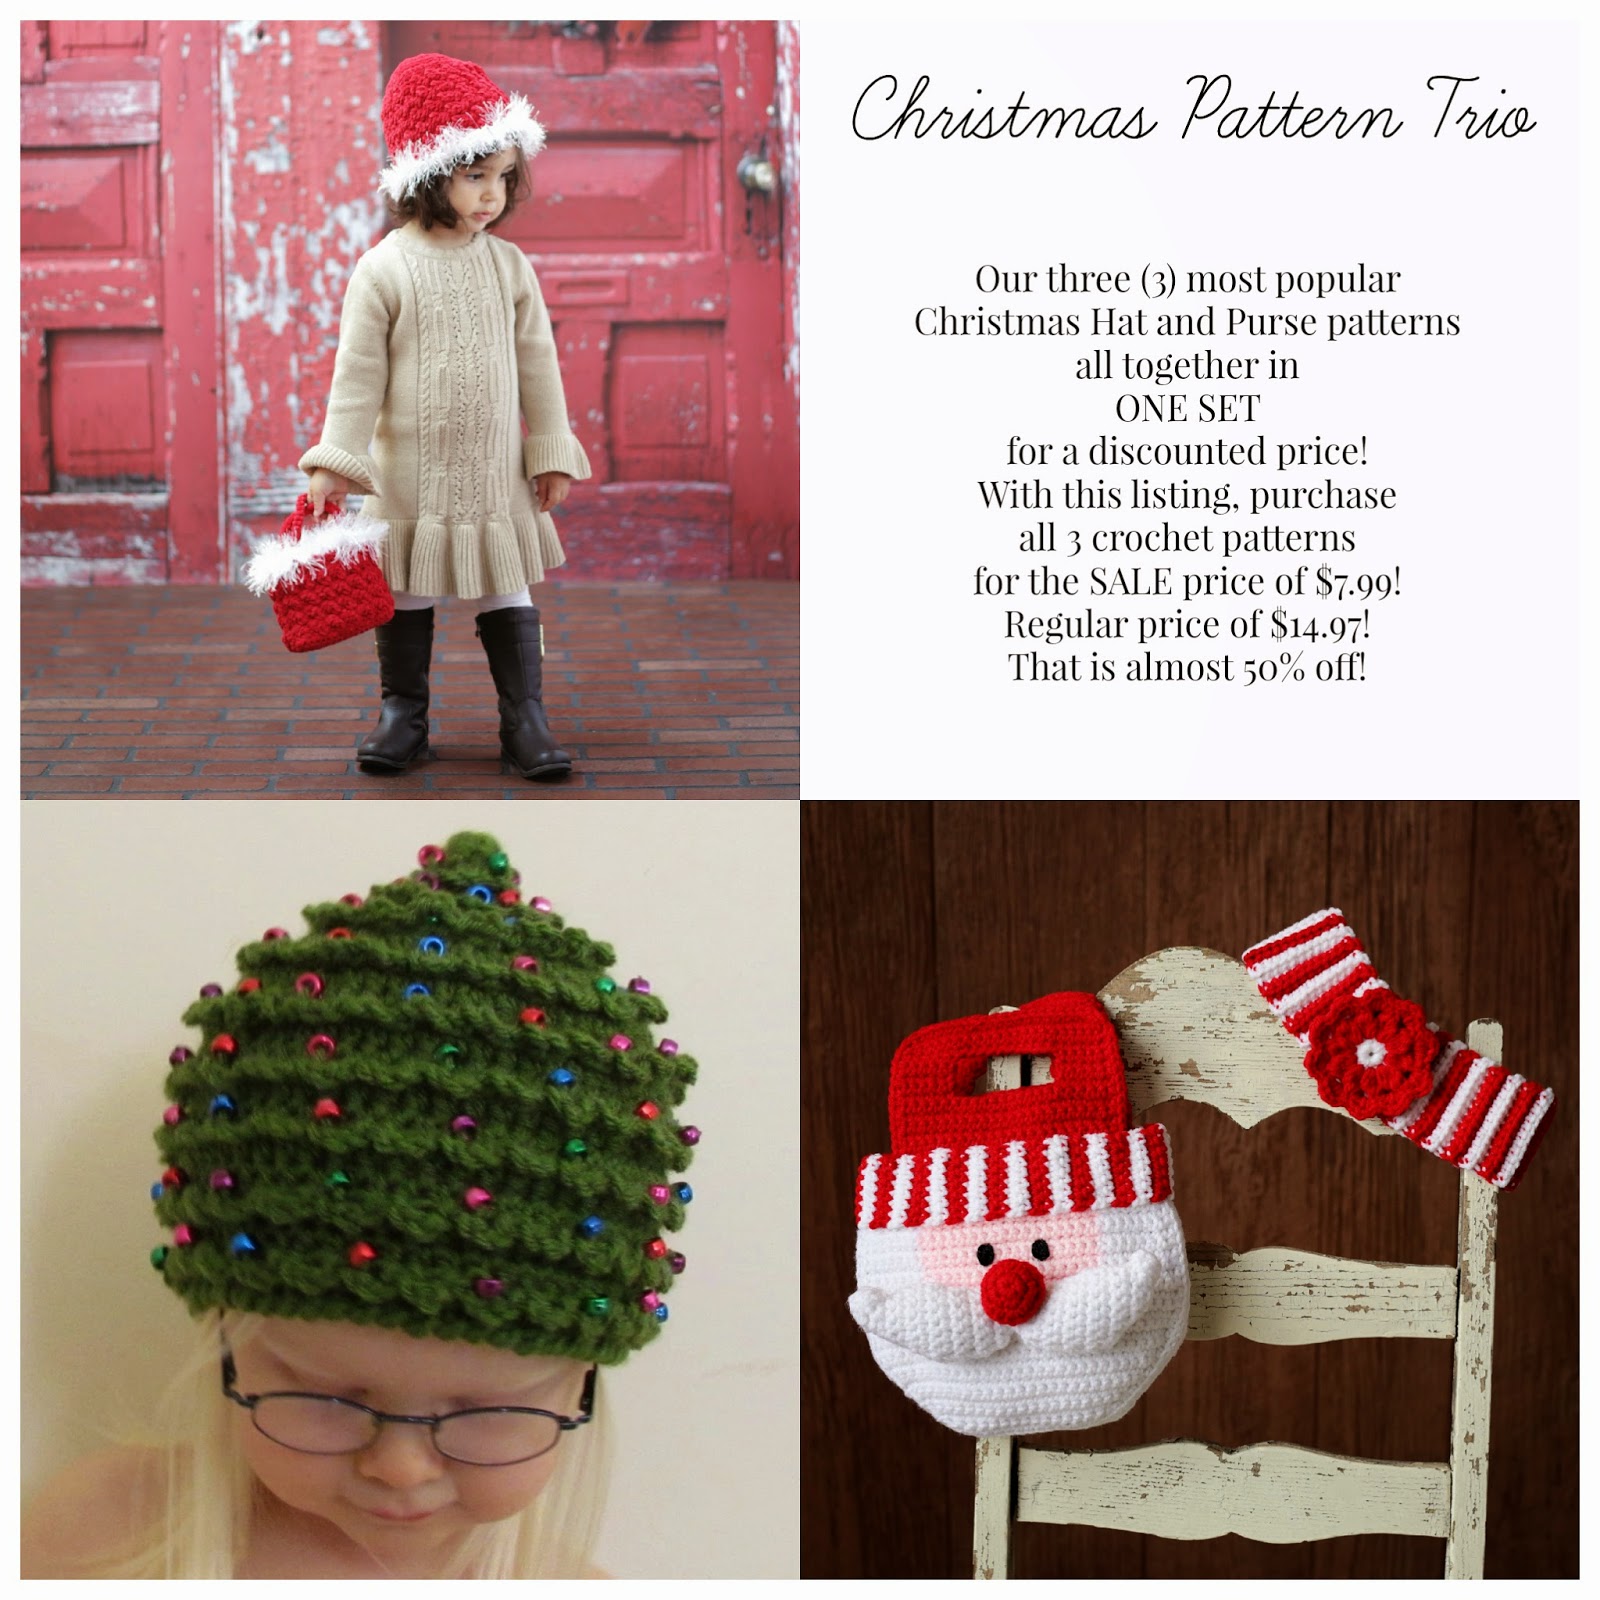
Our three (3) MOST POPULAR CHRISTMAS HAT AND PURSE CROCHET PATTERNS all together in ONE SET for a DISCOUNTED price!


Christmas Tree Hat comes in 5 sizes ranging from Newborn to 5+ years.
Santa Striped Headband comes in 2 sizes ranging from 2 years to 5+ years.
Holiday Hat and Purse Fur pattern comes in 4 sizes ranging from 1 year to 5+ years.

These patterns also work up quickly for last minute Christmas wearables or gifts!

Visit Too Cute Crochet to see all the details on these Pattern Bundles!


This blog contains affiliate links.
Pin It!

CYBER MONDAY 2014

http://www.ravelry.com/stores/too-cute-crochet

 From RAVELRY: 50% off ALL patterns in the Too Cute Crochet/Jocelyn Designs Ravelry Shop on CYBER MONDAY only.
Sale prices are good from 12/1/14 at MIDNIGHT ET until 12/2/14 at MIDNIGHT ET.
You must use the COUPON CODE at checkout of MONDAY

There are 128 CROCHET PATTERN in my Ravelry Shop, ALL 50% off!


http://www.ravelry.com/stores/ambassador-crochet

On CYBER MONDAY, Ambassador Crochet's ETSY shop will be 40% OFF for the entire day! 


Pin It!

BLACK FRIDAY and Cyber Monday Specials


 Are you looking for Black Friday and Cyber Monday sales on crochet and knitting patterns? Then you have come to the right place!


 From Jocelyn Designs: 50% off ALL crochet patterns for one day ONLY. Sale prices of 50% are good from 11/28/14 at MIDNIGHT ET until 11/29/14 at 11:00PM ET. 
NO COUPON CODE IS NEEDED. 


http://www.ravelry.com/stores/too-cute-crochet

 From RAVELRY: 50% off ALL patterns in the Too Cute Crochet/Jocelyn Designs Ravelry Shop on CYBER MONDAY only. 
Sale prices are good from 12/1/14 at MIDNIGHT ET until 12/2/14 at MIDNIGHT ET. 
You must use the COUPON CODE at checkout of MONDAY

There are 128 CROCHET PATTERN in my Ravelry Shop, ALL 50% off!


http://www.ravelry.com/stores/ambassador-crochet

 Kristine of Ambassador Crochet is having a Ravelry sale on BLACK FRIDAY 11/28/14 with 60% off from 12-4 AM. then her BUY 1, GET 1 FREE will be from 4-8AM. For the remainder of Black Friday after 8AM, ALL patterns will be 40% OFF!


On CYBER MONDAY, Ambassador Crochet's ETSY shop will be 40% OFF for the entire day! 


 Karen of KRW Knitwear is having a THREE DAY SALE in her shop.  

 Sale starts at Midnight on 11/28/14 PT and ends 11:59PM on Monday 12/1/14 PT.

ANY order of $75 or more gets FREE SHIPPING the the US.

All Print Patterns are still .99¢ - but order $10 or more of the patterns and get Free Shipping with code patternsfs2014 
Note: This code is only good with Print Pattern purchases only. It will not work with other items in the cart.

Get 25% off all Models in the sample sale. Use code  
models14

Get 25% off all PRINTED books - Event the sale books! use code  
books25


Kristin Omdahl has several Black Friday sales going on! 

Her beautiful Bamboo So Fine Yarn is $4.00 off per skein in her  


She is also giving away FREE PATTERNS!!

All of the PATTERNS in Kristin's RAVELRY shop are 42% off. 

 
ALL SALES RUN TO THE END OF THE MONTH! 


Pin It!